Ultima Underworld I Walkthrough Source: http://home.planet.nl/~nlvv12/uwwalk.html (Site Gone) (Minor Formatting Changes and Spelling done by Ganesh)
Walkthrough version 1.12
By Remco van de Beek (Avocet Dragon)
1. Walkthrough
2. Locations of Quest Items
3. Lizardmen language
4. Mantras
5. Spells
WALKTHROUGH On all levels it's of course always important to get all keys and runestones you can find.
LEVEL 1
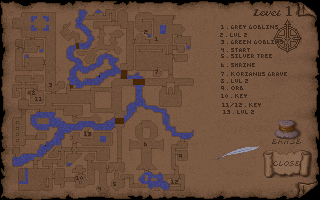
Things to do on this level:
- Get rotworm stew recipe from Lanugo.
- Look at Orb.
Walkthrough for level 1:
On this level there isn't much you can do. Just explore and get experience by defeating monsters. To get the rotworm recipe from Lanugo, (the bodyguard of the King of the Green Goblins), you have to gibe him some gold and ask about the stew. You can also raid the treasuries of the goblin tribes, not very virtuous, by pushing the green goblin guard away to the sleeping quarters and then hacking open the door. And by the grey goblins by hacking open the door and getting as much as possible without attacking anyone.
If you attack the guards all the grey goblins will attack you and as you've probably just started in the game they will be to strong for you. The lever puzzle to get to Korianus Grave is located in the north-east. There are here four levers. With the lever pointing upward is 0 and counting clockwise, put the lever farthest away from the door on 1, the second on 2, the third on 3 and the fourth on 4. Now you can jump in the great hall from platform to platform to get to the grave. Look at the Orb on this level and remember what you see.
LEVEL 2
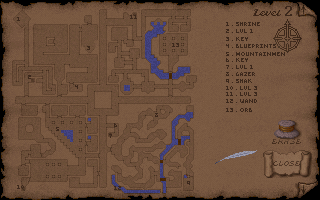
Things to do on this level:
- Defeat Gazer and get reward from Goldthirst.
- Have Shak repair the Sword of Justice for you.
Walkthrough for level 2:
On this level you have to defeat the Gazer in the Northern mines and get the gem cutter as reward from Goldthirst. Talk to Ironwit. He has lost his blueprints. Help him to get them back by first getting the key to the door in the centre of the spiral chamber and getting there the green flying potion or just bash the door in. Now walk to the other side of this section until you come upon a huge gap (you (nearly) can't see the other side). Drink the flying potion and get the blueprints. When Ironwit has his blueprints back he'll give you a flying potion as reward.
Give Goldthirst some gold and be modest. He'll tell you the password to his treasury. It's "deco morono". You can get all his treasures if you want and use the flying potion to get out of the treasury again. Find Shak in the southern brach of the mines and have him repair the Sword of Justice as soon as you've found the blade and hilt of the sword. You can give Goldthirst the huge lumb of gold you get from Anjor. Goldthirst will be very impressed and will give you a serviceable jeweled axe of additional damage. On this level you can also find the moon orb. To get to it's location cast gate travel.
LEVEL 3
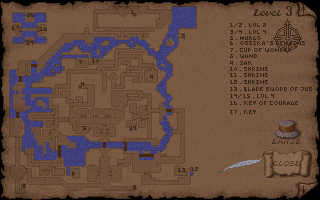
Things to do on this level:
- Get the blade of the Sword of Justice.
- Get Taper of Sacrifice from Zak.
- Get The Cup of Wonder.
- Free Murgo
Walkthrough for level 3:
The Blade can be found in the south-east. As you walk there you'll notice one section of wall covered with vines (, you can find it also by walking against the wall. You'll notice that you aren't able to walk further for no apparent reason suddenly. Here is the secret door). Use this wall and a secret door will be revealed. Now pull the lever and a new section will become accessible. Now walk to the blade and get it. The Taper of Sacrifice is easy to get.
Just trade it with Zak for some food. You can get The Cup of Wonder by playing the flute tune you'll learn from Eyesnack on level 5 in the room with a gazer that is only accessible by swimming there. The room can be found by learning the 3 part mantra by inhaling burning insence and saying this mantra at the shrines. The flute tune is 3 5 4 2 3 7 8 7 5.
The mantra is "insahn". To free Murgo from the prison, you have to give his guard enough food. Don't free Murgo until you've learned the Lizardmen Language from him. If you find Ishtass's remains and bring the note you find there to Ossika, he'll reward you with a Wis runestone a wand and a potion. You can get a broadsword and other nice treasures by locating the secret treasury of the bandits. Of course they'll try to protect it, but they are weak and easily killed. You can also give a red gem to Iss'leek to hear the runestone combination for the Water Walk spell.
LEVEL 4
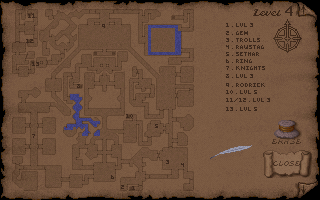
Things to do on this level:
- Kill Roderick and get the Standard of Honor from Dorna Ironfist.
- Give the Gemcutter to Derek.
- give Sethar the Rotworm Stew
Walkthrough for level 4:
You should try to become a knight of the Crux Ansata. Ironfist's first test is to let you swallow a drink. He says it's deadly, but it isn't. Just drink it and admit you where afraid. His second test is to let you find the writ of Lorne. This is located at the shrine in the Troll area. Talk to Rawstag and give him the gem you've found at location 2 on the map. He'll then open the door to the shrine. Get the writ and return it to Dorna. The last test is to get a golden plate. This you can find in the Maze of Silas. To get to the room you have to pull the silver and gold levers in the correct sequence.
You can find the sequence at the 2 gravestones in the Knights area. The sequence is Silver, Gold, Gold, Silver, Silver, Gold. Get the plate and give it to Dorna. He'll give you access to the armory then. Talk to Sethar Strongarm and give him Rotworm Stew. You'll receive Dragon Scales from him. Keep these with you, because they are not vital for your quest, but will make live a lot easier. You can find Roderick in the Banquet Hall.
Defeat him and go to Dorna Ironfist to receive the Standard of Honor. Give the Gemcutter to Derek and he'll tell you how to get the ring of Humility from level 5. The Bullfrog puzzle is really simple. There are two levers and 2 buttons. the first lever is for the X-coordinates and the second for the Y-coordinates. It's a 8X8 grid. Lever pointing upwards is 0 and it counts up clockwise. 0.0 is at the southwestern corner. Push the upper button to make the selected floor tile rise and the lower one to let it descend. Make 2 walkways to the southeast and the northeast corner. And go to the rooms here. The Southeastern one is really difficult o find, but just keep jumping until you jump right.
LEVEL 5
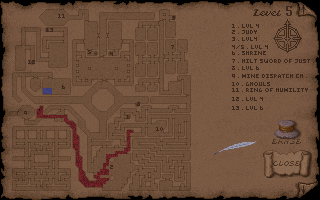
Things to do on this level:
- Bury Garamon's bones.
- Get the hilt of the Sword of Justice.
- Talk to Eyesnack to learn flute tune.
- Give Judy the Picture of Tom.
- Find the Ring of Humility.
- Have Marrowsuck make Dragonscale boots for you.
Walkthrough for level 5:
You can find the hilt of The Sword of Justice in the tombs. The tombs can be accessed by going down the stairs by the bullfrog puzzle or finding the secret door in centre east section of the level. To bury Garamon's bones you'll find on level 8 use them on his gravestone. Talk to Kneeknible and give him 10 fresh fish to learn the code (7-2-6) for the mine dispatch chamber. After this talk to Anjor and agree to help him.
You'll receive a Zanium piece from him. Go to the mines and play pacman, until you've got 80 Zanium pieces. Give those to Anjor and he'll make a huge lumb of gold for you. You can give this to Goldthirst for the axe. Carry a flute with you when you talk with Eyesnack. He'll teach you a tune then. this tune you have to play on level 3 to get the Cup of Wonder. Give Judy the picture of Tom you'll get in the prison cells on level 7 and get the Key of Love.
To get the key of humility, keep from the centre of the room ( stay close to the walls) and flip the switches in this order: Northwest, Southeast, Northeast, Southwest. Now you can safely walk to the centre of the room and get the Ring of Humility from the pedestal. Give the Dragon Scales to Marrowsuck and he'll make boots for you of these in trade for food. These boots are invaluable, the can't break and with it you can walk over lava without losing hit points.
LEVEL 6
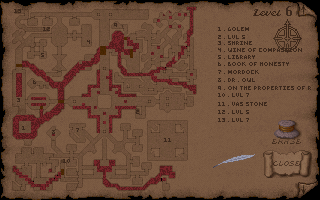
Things to do on this level:
- Get book for Morlock.
- Talk to Illomo.
- Talk to Dr. Owl.
- Defeat Golem.
Walkthrough for level 6:
Talk to Dr. Owl after you've freed Murgo on level 2 to hear from him how to find the Wine of Compassion. Look on the map of level 5 for it's location (nr. 4). It's located under the southeastern most tile in this room. Get a book from Bronus (don't read it) and bring it to Morlock. You'll then hear from him where you can find the book of honesty (look at level 5 map). "It's in the key behind the hourglass". Defeat the golem on the by lava surrounded island and receive the Shield of Valor. Talk to Illomo, before and after you've found Gurstang on level 7.
Say to Illomo "folanae". He'll tell you to find a book in the Library. It's called "Folanae Fanlo". Say "Fanlo" at a shrine to receive the Key of Truth. Find for Ranthru in Vilus's Domain "On the Properties of Runestones". Talk to Gralwart and he'll tell you how to receive the Vas stone. Walk to the eastern branch of the 4 centre paths. And walk from the behind of the wall section with the two "moon eyes" into the wall to be transported into a secret area.
Get four of these rubies and place them on the platforms in the four corners of the Room. Every time you place a ruby shoot between the eyes of the place where you put the rubies. After you've done this for all 4 corners flip the grey switch. I Vas stone will then drop to the ground. Get it and flip the red switch to be teleported back to the area where you left.
LEVEL 7
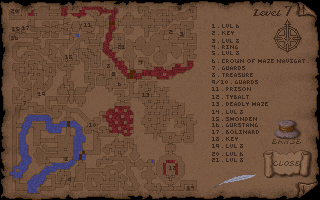
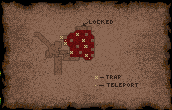
This map can be found on this level. It's tells how to get safely past
the lavapit.
Things do on this level:
- Find Gurstang in the Prison levels.
- Kill Tybalt.
- Free Ariel.
- Get key from Smonden.
- Picture of Tom from Bolinard.
- Get the orb rock on level 8.
- Get Crown of Maze Navigation on level 8.
Walkthrough for level 7:
In the sections guarded with goblins and troll you can pass safely with a medallion and some gold, but it's easier and more fun just to kill them. First go to level 8 and get the orbrock (look at maps how to get it). Find the Crown of Maze Navigation by going down to level 8 and getting the small crown with a white gem in it. Use this crown to get through the deadly maze to Tyball's room. Kill him and free Ariel. Use the orbrock on the Orb here to destroy it and get magic back. Now free the prisoners. Talk to Gurstang to receive the word "folanae" and tell this to Illomo on level 6.
Talk to Smonden to get the key to the section of the Key of Courage (Northwest corner). You have to go down to level 3 from this point and get the Key of Courage. Get the picture of Tom from Bolinard by talking to him and asking him to draw a map for you. Give this picture to Judy on level 4 to receive the Key of Love. Carry the resilient sphere you got from a prisoner to open the secret door to the tombs. Find the Secret room with treasure and kill the Shadow Beast. Here lies the Black Sword of great accuracy. You should now be in possession of the 8 talisman's and the 3 keys. Go down to level 8.
LEVEL 8
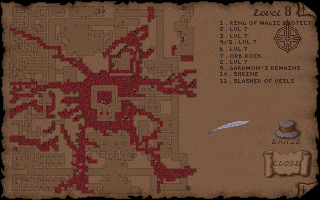
Things to do on this level:
- Talk to Carraso.
- Find Garamon's bones.
- Create Key of infinity.
- Drop Talisman's on central chamber with the Slasher of Veils.
- Follow the Green Path home.
Walkthrough for level 8:
You can find on this level lots of cool items. Just search everywhere for items you like. Find Carraso give him some food and hear where he found some bones. These are Garamon's bones. They are located in the west. You can identify them because there lie 5 runestones and a magic ring by his body. Get his bones and bury them at his grave in the tombs on level 5. Talk to garamon and say first "talismans" and then "lava".
Now create the key of infinity by dropping the 3 keys on each other. Now open the door to the central chamber with it. Now drop the talismans in the lava. A portal will appear and will suck you and the slasher of veils through. Now you are between worlds Remember what you saw in the Orb on level 1? Follow the green path home and walk through the green portal at the end.
Locations of Quest Items
- The Cup of Wonder can be found on level 3. Stand on the raised platform in the room described on the map. Play the flute tune: 3 5 4 2 3 7 8 7 5.
- The Standard of Honor can be found on level 4. Kill Roderick and receive it from Dorna Ironfist.
- The Sword of Justice can be repaired by Shak on level 2. The blade can be found on level 3 in the southeast and the hilt on level 5 in the Tombs.
- The Taper of Sacrifice is located on level 3. Get it from Zak in trade for some food.
- The Ring of Humility can be found on level 5. Don't enter the centre of the room. Walk close to the walls and flip the switches in this order: NW, SE, NE, SW. You can now safely walk to the centre of the room and get the ring.
- The Shield of Valor can be won by defeating the Golem on level 6.
- The Wine of Compassion is located on level 6. Talk to Dr. Owl and hear how to find it. Look for the location on the map. It's beneath the southeastern most floor tile.
- The Book of Honesty can also be found on level 6. Talk to Morlock
after you've gotten his book for him. He'll tell you it can be found
in the key behind the hourglass.
- he Key of Truth can be found by saying "fanlo" at a shrine.
- The key of Love is found at level 5. Give the picture of Tom (that you go on level 7) to Judy.
- The Key of Courage can only be found by descending from level 7 all the way to level 3 (see map).
- The Key of Infinity can be made by dropping the 3 keys on each other.
- Garamon's bones can be found on level 8 in the centre west. Bury
these at his grave in the tombs on level 5.
Lizardmen Language
You can learn the language from Murgo. But if you aren't patient just
use this list:
bica |
hello, goodbye |
'click |
no |
'click-iriass |
Sir Cabirus |
eppa |
visit |
isili |
me |
kri'kla |
lurker |
ossli |
enough |
sel'a |
give |
sor'click |
stranger |
sorr |
enemy |
sorra |
steal |
sseth |
yes |
sstresh |
help |
Thepa |
Lizardmen |
thes'click |
hate |
thesh |
like |
thit |
need |
tosa |
you |
Urgo |
Murgo |
yeshor'click |
friend |
yethe |
kill |
zekka |
food |
Mantras
Skill |
Mantra |
|
|
Seeker of the Mysterious Arts |
Mu Ahm |
Seeker of Mastery of practical skills |
Om Cah |
Seeker of honor and valor in battle |
Summ Ra |
Sword |
Amo |
Defence |
Anra |
Attack |
Ra |
Detect hidden |
Lu |
Evaluate |
Hunn |
Charm |
Un |
Tracking |
Sahf |
Repair |
Lon |
Acrobat |
Fal |
Swimming |
Ono |
Unarmed |
Ora |
Lockpicking |
Aam |
Stealth |
Mul |
| Traps | Romm |
| Identify | Lahn |
| Magic | Sol |
Spells
First Circle
Spells |
Runes |
Create Food |
In Mani Ylem |
Light |
In Lor |
Magic Arrow |
Ort Jux |
Resist Blows |
Bet In Sanct |
Stealth |
Hur |
Curse |
An Sanct |
Second Circle
Spells |
Runes |
Cause Fear |
Quas Corp |
Detect Monster |
Wis Mani |
Lesser Heal |
In Bet Mani |
Rune of Warding |
In Jux |
Slow Fall |
Rel Des Por |
Great Leap |
Uus Por |
Third Circle
Spells |
Runes |
Conceal |
Bet Sanct Lor |
Lightning |
Ort Grav |
Night Vision |
Quas Lor |
Speed |
Rel Tym Por |
Strengten Door |
Sanct Jux |
Summon Monster |
Kal Mani |
Fourth Circle
Spells |
Runes |
Heal |
In Many |
Levitate |
Hur Por |
Poison |
Nox Mani |
Remove Trap |
An Jux |
Resist Fire |
Sanct Flam |
Sheet Lightning |
Vas Ort Grav |
Fifth Circle
Spells |
Runes |
Cure Poison |
An Nox |
Fire Ball |
Por Flam |
Missile Protection |
Grav Sanct Por |
Name Enchantment |
Ort Wis Ylem |
Open |
Ex Ylem |
Smite Undead |
An Lor Mani |
Sixth Circle
Spells |
Runes |
Daylight |
Vas In Lor |
Gate Travel |
Vas Rel Por |
Greater Heal |
Vas In Mani |
Paralyse |
An Ex Por |
Telekinesis |
Ort Por Ylem |
Thick Skin |
In Sanct |
Seventh Circle
Spells |
Runes |
Ally |
In Mani Rel |
Confusion |
Vas An Wis |
Fly |
Vas Hur Por |
Invisibility |
Vas Sanct Por |
Reveal |
Ort An Quas |
Water Walk |
Ylem Por |
Eight Circle
Spells |
Runes |
Flame Wind |
Flam Hur |
Freeze Time |
An Tym |
Iron Flesh |
In Vas Sanct |
Roaming Sight |
Ort Por Wis |
Tremor |
Vas Por Ylem |
Armageddon |
Vas Kal Corp |
You hear about the Armageddon spell from the wisps, a really strong spell. Kills everything. Fun to cast but it doesn't make the game easier to finish.