Creating a [Private] Torrent using uTorrent (Guide / Tutorial)
Version 0.522
 This article explains how to share large files with either your friends (privately) or with anyone (publicly) using BitTorrent and uTorrent, optionally using uTorrent's built in embedded tracker..
DISCLAIMER
Proceed at your own risk! The information here is accurate to the best of our knowledge. We will not be held responsible if this document causes your computer to explode or burst into flames. In real serious terms, if any corruption of data, hardware damage or any other kind of damage/losses/etc. arises from the use of this document, We will not be responsible for it. If you don't like this, please don't read any further.
Introduction
What are the options when you want to send a 4.3GB DVD folder to your family, relatives and friends? Rapidshare? Megaupload? Or <gulp>... MSN? Free media file hosts have some limits either in the maximum data you can download per day, or the constant nagging to buy their premium service. And MSN is not designed for sending such large files - just imagine if the file stalled at the 97% mark - You will need to resend the entire file! MSN's Shared Folders had some promise but it was later replaced by SkyDrive, which limits each file to 50MB, although it gives 25GB of space.
So what other alternative is there? There's FTP. Or you can take a risk and send it via MSN. Or you can split the file in segments and upload it to a SkyDrive, RapidShare, MegaUpload or other file hosting server.
If you have a web hosting server, you can upload it to there. But chances are your web host will not be too happy about it as their terms of service do not allow you to share resource intensive files. Except perhaps our web host, DreamHost - they offer a huge 50GB of space just for backups, along with their normal webspace so you can use it as a convenient file storage centre.
So what else?
Enter Bittorrent - a very efficient peer-to-peer (P2P) file sharing protocol to share your files with anyone, anywhere. You can share files privately within only people you choose, or publicly with anyone on the Internet. The only requirement is a internet connection.
Starting off...
You will first need to install and optimize utorrent for maximum speed. This has already been covered in another guide. Please follow it first.
A tracker is needed for all peers to connect to for a updated list of peers. Fortunately, utorrent comes with a built-in tracker function that we will utilize for this guide. If you want to use an external tracker such as OpenBitTorrent, obtain the announcer URL from the site. It will look something like this: http://site.com/announce or udp://site.com:1111. In OpenBitTorrent's case, it will be http://tracker.openbittorrent.com/announce and udp://tracker.openbittorrent.com:80/announce .
For torrents you intend to share with everyone, you will also need to upload the torrent to a tracker site (such as legaltorrents.com) with an appropriate title and description for others to find and download.
Otherwise, you can simply use uTorrent's built-in tracker and upload it to a personal website. In any case, for everyone to be able to download your files, they will need to obtain the torrent file from somewhere such as an online site, via e-mail, via MSN or via file sharing sites such as RapidShare. Without it, they will not be able to download your files.
Pros and Cons of Using uTorrent's Built-In Embedded Tracker
| Pros |
Cons |
|---|---|
| Private. Only you and the people you send the torrent to know about your torrent. | Your IP address must not change. IP addresses can change if you use a dial-up connection and need to manually reconnect to the Internet every time you switch on the computer. If you are using a broadband router such as 2Wire, Linksys, DLink, Belkin, etc, chances are that your IP address never changes unless you restart your router. If it does, it can be somewhat subverted with services like No-ip but the downloaders will be need to be told specifically to refresh their DNS when your IP changes |
| Simple. Just an on/off switch - not much fuss needed | No control over who can connect to the tracker (unless a firewall is used, advanced). Anyone can connect to your tracker and share their torrent IF and only IF they know your IP address and port number. And you wouldn't know - as uTorrent has no interface to show what is going on in the tracker! However, the occurrence of this is very rare as the person would need to know your IP address and port. Also, the person can only use your tracker to share files from his own PC so it is a very very minor con. |
So which one should you use? If you are creating a torrent only to share with people you know, go with uTorrent's built-in tracker. Else, for torrents that you want anyone to be able to download, go with public trackers.
Using uTorrent's Built-In Tracker
This step is only necessary if you are using uTorrent's built in embedded tracker. If you are using public trackers, it is not needed and you can skip to the next section.
- Start uTorrent (if it is already not running)
- Check that your port is opened properly by entering your port number below and clicking Submit. Ensure that uTorrent is running before submitting.
Your port number can be found in uTorrent > Options > Preferences > Connection > 'Port used for incoming connections:'.
When you click Submit, there should be a OK! word with a green background as shown in the screen shot below. If not, please read the guide on how to port forward as port forwarding is important for downloaders to be able to connect to you.
- Note down the IP address mentioned in the line
Checking port ..(Port Number)... on ...(IP Address)...
Here is a screen shot to better explain (the IP address is blurred for privacy reasons):
With the information, you can now form the tracker URL. Your tracker URL will be
Port Checker Results and how to obtain your IP address, numbers in the dark blue box shows your IP address
http://(IP Address):(Port Number)/announce
For example, if your port number is 55641 and your IP address is 209.85.171.100, your tracker URL will be:
http://209.85.171.100:55641/announce
The above is just an example. You will need to substitute it with your IP address and port number you obtained above.
NOTE: Your IP address must also NOT change until you finish sending the files to your friend. This means you should not restart your router or disconnect your dial-up session until you finish sending the files. If your IP address changes, no one can connect to you and the torrent will stall as the peers will not know your new IP. However, activity between peers will continue, just that new peers will not be able to join the torrent. If no one other peer has the complete file when you change IP or disconnect, the torrent will stall.
We will need this tracker URL later, so note it down somewhere for now.
- In utorrent, go to Options > Preferences > Advanced
- Change the Value of bt.enable_tracker to true
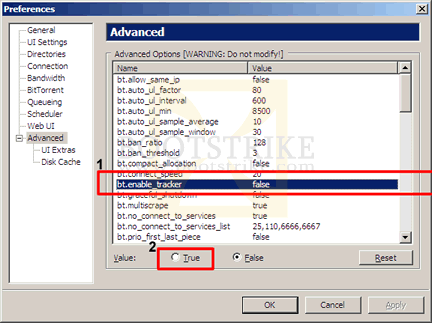
Setting bt.enable_tracker to true - On the left, click Bittorrent
- Set the IP/Hostname to report to tracker to your IP address we identified just now. You only need the IP address, do not include the port number. In our example, it would be:
209.85.171.100
- You're set! Click OK.
Creating the Torrent
You cannot change any part of the download once it is created. For example, if you create a torrent from a folder named 'WEDDING', you must not modify the contents of the folder by adding any new files to the folder as those will not get sent.
Lets start to create a torrent.
- Place all your files that you want to share in one folder.
- Start uTorrent (if it is already not running)
- Click File and then Create New Torrent...
- Under Select Source, select the folder containing the files you want to share by clicking on Add directory
- Under Trackers: add your tracker server. If you are using utorrent's built-in tracker, follow the format stated above. For example, if your port number is 55641 and IP address is 209.85.171.100, your tracker server will be:
http://209.85.171.100:55641/announce
Otherwise, if you are using public trackers, simply add the tracker address into the Trackers box. - If you are using utorrent's built-in tracker, under Trackers, add another line with an entry replacing your IP address with 'localhost' but leaving the port as the same value. For example, if your port number is 55641, the new line will be:
http://localhost:55641/announce
- Add a comment to describe your torrent under Comment. This is optional and only helps for torrents in public trackers so that people can easily identify the contents of the torrent
- Tick the boxes labeled Start seeding and Private torrent. If you are going to upload this torrent in a public network for *anyone* to download (e.g. ISOHunt or OpenBitTorrent), do NOT tick Private Torrent.
It should now look something like this:
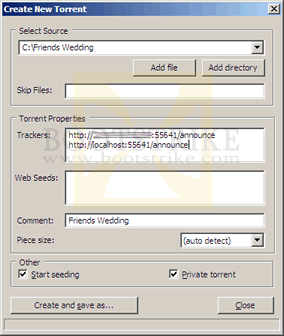
Create New Torrent, with the boxes filled in. If you are not using utorrent's built in embedded tracker, you don't need to have the 2nd line under Trackers - You're almost set! To make the torrent, click 'Create and save as...'. uTorrent will begin hashing the files and then asks you where to save the resulting torrent file. Put it in a location you can remember. You will need this file later.
- Click Close.
- You should see the torrent in your list with a green up arrow (like this:
 ) with the status Seeding.
- If the arrow is red and you are using the built-in tracker,
- Did you set the port correctly?
- Did you add the localhost entry as stated above?
- Did you set bt.enable_tracker to true?
- Double-click the torrent row and check the list of Trackers. If it is wrong, delete and recreate the torrent again following the steps outlined above.
- If the arrow is red and you are using an external tracker,
- Double-click the torrent and check the list of Trackers to ensure it matches the value provided by the tracker operator. If it is wrong, delete and recreate the torrent again
- If you are using another computer to host the tracker, make sure that computer is setup for port forwarding correctly.
- You may need to upload your torrent at the tracker website and download it back again. After downloading it back, open the torrent in uTorrent and set the Save folder as the same folder you selected when you created the torrent. uTorrent will recheck and automatically begin seeding the file.
- The tracker may require registration or some other action from you. Check the tab Trackers > Status column for the details of the error.
- If the arrow is red and you are using the built-in tracker,
- You're now set and are seeding the torrent!
Getting your Friend to Download
It's simple - just send the torrent to your friend and your friend simply has to add it to his favorite bittorrent software (such as uTorrent). Just like downloading any other torrent!
- Send (via email or any other method you prefer) the torrent file that you saved in the previous step to all the people you want to share the files with.
- Your friends simply need to add the torrent to their favorite bittorrent software such as uTorrent, Bit Comet, Azureus, etc..
Checking For Activity
Give it some time (up to a minute) for your friend to connect to you. You should see your upload rate start to increase with every peer that begins to download from you. Activity can be monitored in the Peers tab, after you select the torrent row.
Some public trackers may request utorrent to update trackers at only a certain interval (e.g. 30 minutes). If you are not able to right-click the torrent and click 'Update Tracker', the only thing you can do is wait till utorrent gets a new list of peers from the tracker. uTorrent's embedded tracker updates every 5 minutes.
Frequently Asked Questions (FAQ)
| 1) | Must my friend use a torrent client to download my files? Yes, but you don't really have to install any software to download it. Sites such as Torrent Relay and BitLet allow a user to download the torrent without installing any software. However, when you use such sites, you are letting those sites know information about the torrent you are downloading. |
| 2) | My internet is slow / online gaming is full of lag / how do I control how much upload bandwidth I use for a particular torrent? You need to slow down your upload rate. Right-click the utorrent icon in the bottom right at the system tray > Upload Limit > (set a lower rate). |
| 3) | My peers are receiving the error messages "invalid http reply" or "connection closed by peer"?
Another alternative would be to use public trackers instead. Note that using public trackers can end in people you don't know downloading your torrent. |
| 4) | What solutions are there if I am not able to perform port forwarding?
Once the torrent is seeding, go to the Peers tab, right click on a blank area, click 'Add Peer...' and enter the string above for each peer in the seeding computer. If even other peers are not able to port forward, you should either use a public tracker or find another computer who can host the tracker (not the actual download). Then when you create the torrent, specify the tracker as the other computer's IP. No 'localhost' tracker is required in this case. Ensure that all parties are using at least uTorrent v2 to take advantage of the UDP hole punching feature. |
Last Updated 5th July 2010.
Errors? Omissions? Need Help? Know something? Post your queries in the comments below.
This document is Copyright(©) 2008-2010 by G.Ganesh. If this guide has helped you, please consider donating or if you are not able to, add to your favorite social site using the Bookmark link below.
| new post | [ expand all ] |
75 comments
Page: Prev 1 2 3 4 Next Show All
Last edited by Admin 9 Sep 2017 .
Page: Prev 1 2 3 4 Next Show All