How to Network Computers Together Using Windows 98/ME/2000/XP
Version 1.01
Windows XP's network managment is easier than ever. However, using the Network Setup Wizard may not be preferred as it does not give much control.
DISCLAIMER: Proceed at your own risk! The information here is accurate to the best of my knowledge. I will not be held responsible if this document causes your computer to explode or burst into flames. In real serious terms, if any corruption of data, hardware damage or any other kind of damage/losses/etc. arises from the use of this document, I will not be responsible for it. If you don't like this, please don't read any further.
ASSUMPTION: This guide assumes that all computers are running at least Windows 98 and have their Network Interface Card drivers installed.
1. Planning for the network
First, how many computers do you need to network together?
If it is exactly two computers only, you only need a Crossover Ethernet Cable to connect the computers to each other. This is the fastest connection as each computer directly communicates with the other computer.
Hub
Switch
Router
If it is more than two computers, you will need either a Hub, Switch or Router. A Hub is the cheapest but is NOT the way to go if you are on a budget as a Switch is only slightly more expensive. A Switch contains all features of a Hub, but it is much faster at handling heavy tasks. Notice that they look the same - it is only the internal handling of data that differs.
Finally, a Router contains features of a Switch, plus being able to be a standalone Internet Gateway - being able to provide internet access to all computers connected to it. When purchasing any of these options, ensure the number of ports that the device has meets or exceeds the number of computers. And remember to get Category 5 Ethernet Cables for each computer to connect to the device.
NOTE: With many broadband internet contracts, a router is provided free of charge or for a small top-up. Common brands are Linksys, D-Link, 2Wire, Netgear. The router would also normally come with one ethernet cable to connect your main PC.
Most folks would go by the Router method. Keep in mind that a Router has all features of a Switch/Hub. Once you have the equipment, hook them up together. The network device is the center - all computer's Network Interface Card's connect to it via the Ethernet cable.
2. Setting up the network
This step is not required if you are using a router (Skip to step 3). Routers dynamically allocate IP address to your computers. If you are using a switch or a hub, we have to manually give each computer a number. The order doesn't matter, but I personally prefer to give the Internet Sharing Computer or the master computer - the fastest one - the first number. The computer's IP address would be 192.168.1.<number>. So assuming we have 3 computers, they would be numbered as follows:
PC 1 - 192.168.1.1
PC 2 - 192.168.1.2
PC 3 - 192.168.1.3Power up all computers and the switch. To configure the IP address for each individual computer:
- Go to Start > Settings > Control Panel > Network Connections (double-click it)
- Look for Local Area Connection
- If the status is Network cable unplugged, check the cable connection. It should not show "Network cable unplugged" when you proceed to the next step.
- Right-click Local Area Connection, Properties. Ensure the Internet Protocol is checked.
- Also ensure that Client for Microsoft Networks and File and Printer Sharing for Microsoft Networks is checked. This will enable you to share files across the network.
- Highlight Internet Protocol (TCP/IP) by clicking it once, and click on Properties.
s
- The field "IP address:" is where we will input the IP address. The Subnet mask should be 255.255.255.0
- If there is a Internet sharing computer in the network, the Default Gateway and Preferred DNS Server will be the Internet sharing computer's IP address. Otherwise, it would be blank. Hit OK two times and the setting should be saved.
Repeat the above for every computer.
Now go to Start > Settings > Control Panel > Network Connections (double-click it). If it still doesn't say Connected, right-click the connection, Disable. Wait a few moments, and right-click the connection, Enable. Now it should say under the status: Connected!
We've basically configured the computers so that they can find each other. Now how do we share folders and access them from the other computer? Or play LAN games?
3) Sharing folders and playing LAN games
- Right-click any folder in Explorer, click Properties.
- You will notice a new Sharing tab. Check the box "Share this folder on the network" under Network Sharing and Security. Check the 2nd box if you want to allow the other computer to modify your shared folder, else it will be read only. Remember the share name, you will need it to access the share from another computer.
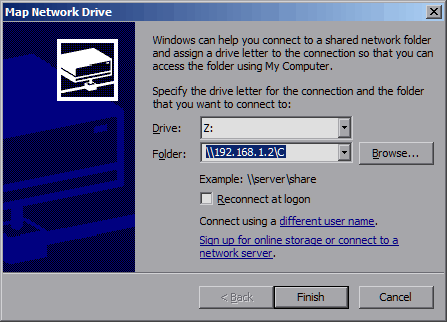
- To access the computer's shared folder, you would click on My Computer > Tools > Map Network Drive.
- Here is the syntax:
\\<ip address>\<share name>
So if the computer is 192.168.1.2 and the share name is C, the Folder field would be "\\192.168.1.2\C". Check the "Reconnect at logon" if you want this drive to be available when you restart the computer.
- That's it - once you click Finish, Windows XP will attempt to connect to the computer's share. Next you should see a new drive in your Explorer with the shared folder's contents.
For LAN gaming, it could not get any simpler! Most LAN games support the UDP Discovery method of detecting servers whereby you just have to go to the LAN games tab and the list of servers would be obtained automatically.
- Start a server on the computer. Normally this will be indicated as Host Game.
- Once the server is up and running, go to the other computer.
- Select the option to join a network game. If there is a list, the server name should appear in the list. If yes, simple double click it to join. Otherwise, choose the "Enter IP" option.
- Enter the IP address of the PC that is running the server.
4) Sharing one Internet connection with the other computers (WITHOUT router)
There are two options for sharing an Internet Connection. One is to use Windows Internet Connection Sharing (ICS) Wizard or the other is to use easy to use proxy software and configure it manually.
The Internet Gateway Way by using Windows XP ICS
This part will not be detailed in this guide.
The Proxy Way by using CCProxy
The disadvantages of using a proxy server is that you cannot use any application that requires a direct connection to the other party. Examples are P2P applications, Bit Torrent, Multiplayer Games and remote desktop controlling.
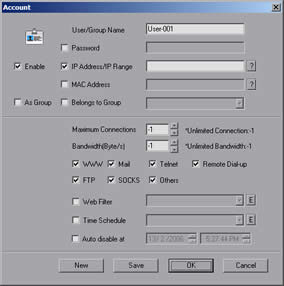
The free version supports up to 3 users which is sufficient for most home users. First download and install CCProxy from the website. Configure it by clicking on Account, changing the Permit Category to Permit Only, and manually adding each IP address by clicking on New. User/Group Name would be any name you want to give to that computer, Enable should be checked, IP Address/IP Range would be the clients address and WWW and Mail should be checked.

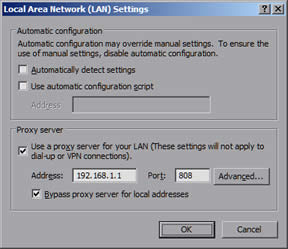
For each of the other clients, you have to configure their internet proxy server settings to point to the master computer, which in this case is 192.168.1.1.
Log on to the Internet in the master computer. In all client computers, the Internet should now be working.
5) Sharing one Internet connection with the other computers (WITH router)
For folks using the router, the Internet Gateway is in the router itself. Because each router has its own setup interface, here are some URLs to configure common routers.
Router
Setup URL
Username
Password
Linksys
http://192.168.1.1/
admin
D-Link
http://192.168.0.1/
admin
Netgear
http://192.168.0.3/ or http://192.168.1.1/
admin
password
SMC
http://192.168.2.1/
2wire
http://192.168.0.1/ or http://gateway.2wire.net/
admin
If your router is not above, you can find the full list here but it may not be updated. Consult your router's user guide for the password. Most routers should work with cable connections out of the box. However, ADSL and other dial-up internet services require configuration such as username, password and PPoE selection. This is where the router's configuration page comes in.
6) Troubleshooting
Most networking issues are because of a Firewall being installed. The fix is to place all your home computers in the Trusted Zone of the Firewall - this will allow all traffic from your home computer undisturbed.
1)
I've assigned all my PCs with IPs and have shared some folders - but I still can't access the other PC's shared folder!
Most of the time, this is because of a firewall in the PC. Configure it such that all your home network computers are in the Trusted Zone.2)
I can't find/connect to my PC Network Server!
Most of the time, this is because of a firewall in the server PC. Configure it such that all your home network computers are in the Trusted Zone.3)
I am sharing many folders in my computer and want to stop sharing.
Disable "File and Printer Sharing for Microsoft Networks" for the network connection in the network adaptor properties.4)
How do I obtain the IP address of a computer if I am using a router?
Start > Control Panel > Network Connections. Double click on the "Local Area Connection" that you are using for the network. Click on the support tab. The IP address will be stated in the "Connection status" field.5)
What is the fastest way to transfer files from another PC?
There are many ways, here is the sorted list, from fastest to slowest
- Physically removing the hard disk from PC A and connecting it to PC B physically inside. Requires technical know-how (Up to 300 MB per sec (SATA2), which is not achievable as most hard drives themselves are not so fast).
- Using 1 Gbps network cards with Cat 5 cables (Up to 128MB per sec)
- Using Firewire 800 (Up to 98 MB per sec)
- Physically removing the hard disk and using a USB 2.0 enclosure to connect to the other PC (Up to 60 MB per sec)
- Using Firewire 400 (Up to 49 MB per sec)
- Using 100 Mbps network card. This is the most common technology used in home and offices (Up to 12.5 MB per sec)
Last Updated 9th July 2008.
Errors? Omissions? Need Help? Know something? Post your queries in the Windows XP Discussion Forum.
You may be interested in our other Windows XP guides. including a comprehensive FAQ, dual booting with Windows 98 and how to dual boot with formatting.
This document is Copyright(©) 2001-2008 by G.Ganesh.
| new post | [ expand all ] |


26 comments
Page: Prev 1 2 Next Show All
Page: Prev 1 2 Next Show All