
Tutorial to Dual Booting Windows XP and Windows 7 / Windows Vista With Windows 7 / Windows Vista Already Installed
Version 0.52
This article shows how to install Windows XP with Windows 7 / Windows Vista already installed. No data will be lost, no extra software is needed and you can choose which operating system to boot everytime you power on your system.
DISCLAIMER: Proceed at your own risk! The information here is accurate to the best of my knowledge. I will not be held responsible if this document causes your computer to explode or burst into flames. In real serious terms, if any corruption of data, hardware damage or any other kind of damage/losses/etc. arises from the use of this document, I will not be responsible for it. If you don't like this, please don't read any further. Do perform a complete BACKUP of your files to an external drive before performing such operations.
Is this document intended for you?
- You want to install Windows XP in a computer that has only Windows 7 / Windows Vista installed
- You have made a backup of your system in case something goes wrong
Quick Directs
- What is Needed
- Preparation of XP Installation Drive
- Installing Windows XP
- Reinstating Windows 7 / Windows Vista Back
- Putting Back XP in the Boot Menu
Assumptions
- This guide assumes you want to install Windows XP into Drive D. If you want to install to another drive, substitute the appropriate drive letter for D.
- This guide assumes Windows 7 / Windows Vista is installed in Drive C
- Windows 7 System Restore Points will be deleted when you boot to XP. This is normal, and can only be avoided if you hide the Windows Vista / Windows 7 drive from Windows XP.
- If your hard disk is SATA, it should either be running on Enhanced IDE mode and NOT in AHCI mode.
1) What is Needed
- Windows 7 / Windows Vista Original Installation DVD
- XP Installation Disc (preferably SP3)
- A drive with at least 5GB free space
2) Preparation of XP Installation Drive
This guide will assume that you will be installing XP to Drive D. If you have no such drive, this guide will show you how to create a 'Drive D'.
- Click Start
- Click Computer
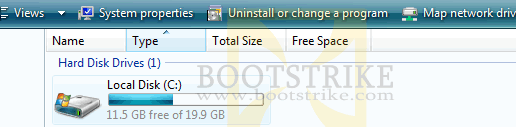
- Under Hard Drives, there should be one labeled "Local Disk C:"
If you don't have a Drive D, you must create a new partition. There is no Drive D in this image, so we are going to create one- If you don't have a Drive D with at least 5GB free space, you need to create a partition as below.
Creating a Partition
Skip this part if you already have a Drive D with at least 5GB of free space when you would like to install Windows XP to.
- Click Start
- On the right column, right-click Computer on the left column
- Click Manage
- Vista should pop a User Account Control box, click Continue
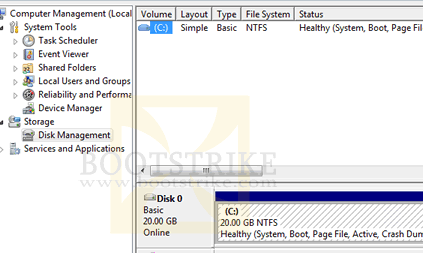
- Computer Management window opens
- In the left column, expand Storage to reveal Disk Management.
- Click Disk Management
Disk Management- Right-click the shaded area (or the area labeled C:)
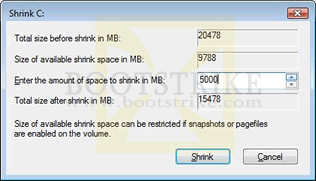
- Click Shrink Volume...
- In "Enter the amount of space to shrink in MB", enter the amount of space in MegaBytes that you want to dedicate for Windows XP. We recommend at least 5GB (that's 5,000 MB (MegaBytes)).
If you are planning to use XP as your main operating system, you may want to dedicate more space for the drive as the process will be harder after installation of XP. Remember to ensure that Windows 7 / Window Vista's drive has sufficient space left for its own use (at least 15GB)- Click Shrink
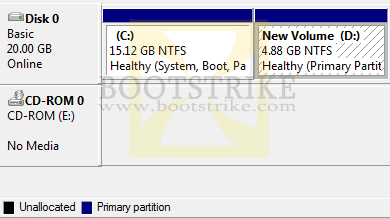
A new 'Unallocated' partition is created beside C drive
- Right-click the Unallocated partition
- Click New Simple Volume...
- Click Next 2 times
- Note the drive letter assigned under "Assign the following drive letter". In our case, it is E as the letter D is already taken up by the CD-ROM drive. We will need to fix this later on. Click Next.
- Enter a name for the drive under "Volume Label". You may want to name it WINXP.
- Place a checkmark for "Perform a quick format"
- Click Next
- Click Finish
The new drive will be formatted and made ready to be usedChanging Drive Letters
Note: Skip this part if your Drive D already points to a valid hard drive partition and not to a CD-ROM drive.
Our new partition is now Drive E. For cosmetics sake, we prefer the new drive to be Drive D. If you are fine (or require it to be such for some compatibility reason) Drive D to be the CD-ROM drive and E being the Windows XP drive, you can skip this part.
At this point Drive D is ready for installation of Windows XP.
- In your task bar, close all programs except Computer Management
- At Computer Management, with Disk Management selected on the left, right-click the CD-ROM (D:) and click Change Drive Letter and Paths...
- Click Change...
- Under "Assign the following drive letter", select K (or any other letter besides D)
- Click OK
- Click OK for the warning that appears
- Right-click the newly created partition labeled E: and click Change Drive Letter and Paths...
- Click Change...
- Under "Assign the following drive letter", select D
- Click OK
- Click OK for the warning that appears
- Right-Click the CD-ROM (K:) and click Change Drive Letter and Paths...
- Click Change...
- Under "Assign the following drive letter", select E (or any other letter besides D)
- Click OK
- Click OK for the warning that appears
The drives now have nicely assigned drive letters
3) Installing Windows XP
Now we proceed to install Windows XP.
- Insert the Windows XP Installation Disc into your PC
- Restart your PC and look for the "Press any key to boot from CD ..." prompt and quickly hit Enter. You only have a few seconds to do this before it proceeds to start Vista
After you hit Enter, it will take sometime for Windows XP Setup to start. If you don't see the prompt no matter how many times you restart, you need to configure your BIOS to boot from CD.- At the welcome page, press Enter
- Accept the licence agreement by hitting F8
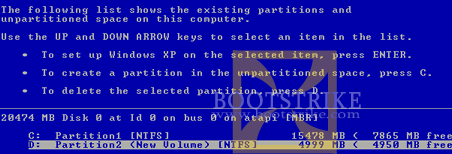
- At the installation drive selection page, select the newly created D drive by hitting the down arrow in your keyboard. Do NOT select the default entry, which is Drive C.
For Windows 7 systems: Drive C may be labeled as "System Rese". In this case, you should select Drive E. You can verify that it is the correct drive by checking whether the name in brackets for that row matches the name you gave just now in Step 2, which we suggested to give it as WinXP. In the image above, we gave it the name "New Volume" when we created the new drive.
- Press Enter
- In the file system selection page, highlight the option "Leave the current file system intact (no changes)". Do NOT highlight any of the Format options. This should be already selected by default.
- At this stage, you are still able to boot Vista as per normal and you can terminate this tutorial safely if you wish.
Proceeding to the next step will install XP and make Windows 7 / Windows Vista unbootable unless you follow the entire guide.- Press Enter
- Windows XP will begin installing to Drive D (or to the drive you selected). Follow prompts normally until you see the Windows Bliss (the trademark wallpaper) .

4) Reinstating Windows 7 / Windows Vista Back
At this stage, you should have completed installing Windows XP to Drive D (or to the drive you selected). You would have noticed that you can only boot into Windows XP now.
We need to fix Windows 7 / Windows Vista back together with XP and this is where the Windows 7 / Windows Vista installation disc comes in
- Insert the Windows 7 / Windows Vista DVD and restart your PC
- Restart your PC and look for the "Press any key to boot from CD or DVD . . ." prompt and quickly hit Enter. You only have a few seconds to do this before it proceeds to start XP
Press any key to boot from CD or DVD . . .
- Click Next at the "Install Windows" screen.
- Click Repair your computer at the bottom left of the window
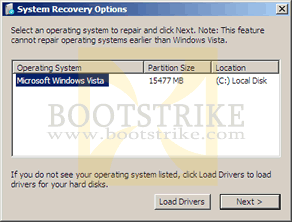
Windows 7 / Windows Vista Setup searches for Windows 7 / Windows Vista installations- After the search is completed, click Next
System Recovery- Click Startup Repair. For Windows 7 systems, just proceed to click Next.
Vista Setup will attempt to repair the boot sector- Click Finish

5) Putting Back XP in the Boot Menu
After the restart, you should be back in Windows 7 / Windows Vista now. Unfortunately, now you cannot access Windows XP. Here's how to put back XP into the boot menu.
Option 1: Run a Batch File (Automated)
- Right-click this link and Save Target As
- Save to your desktop
- Insert the Windows 7 / Windows Vista Setup disc to your E drive
- If your drive letters are different, you will need to EDIT the bat file and replace E: with the appropriate drive letter (thanks juliabird)
- Go to your Desktop.
- Right-Click the file, and click Run as administrator
Note: The third command may give an error which can be safely ignored.
Option 2: Run Commands Manually
- Insert the Windows 7 / Windows Vista Setup disc to your E drive
- Click Start
- Type CMD and press Ctrl+Shift+Enter (press and hold Ctrl, press and hold Shift, press and hold Enter, release all)
- Windows should pop a User Account Control box, click Continue
- You should see a command prompt.
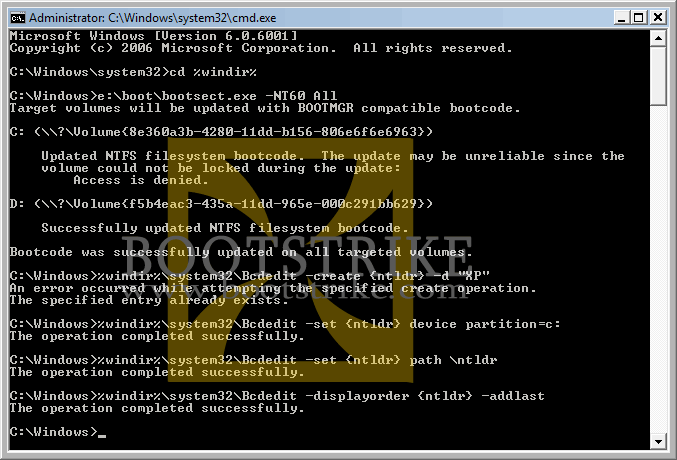
After typing each line below, press Enter on your keyboard. Do NOT copy and paste, you must type it out. Note that we are assuming Drive E to contain your Windows 7 / Windows Vista installation disc and Drive C to contain the Windows 7 / Windows Vista installation. Substitute the drive letters in the 2nd and 4th lines where needed.
cd %windir%
e:\boot\bootsect.exe -NT60 All
%windir%\system32\Bcdedit -create {ntldr} -d "XP"
%windir%\system32\Bcdedit –set {ntldr} device partition=c:
%windir%\system32\Bcdedit –set {ntldr} path \ntldr
%windir%\system32\Bcdedit –displayorder {ntldr} –addlastNote: The third command may give an error which can be safely ignored.
The DOS Commands and the responses- For Windows 7 systems, you will need to additionally copy the NTLDR and NTDETECT.COM files from the Windows XP Disc to your C Drive.
[ thanks to distrakted ]
- Go to Start > Computer
- Right-click your CD-ROM drive containing your Windows XP Disc and click Open
- On the top right of the window, type NTLDR in the search box
- Copy that file to your C Drive (Select the file > Organize > Copy > Go to C Drive > Organize > Paste)
- Search for NTDETECT and copy that file as well to C Drive
That's it. Restart your system, and a menu will appear to ask your choice of operating system to boot up.
If you get errors like "The boot configuration data store could not be opened" - you are not running the file / command prompt as a administrator.
Revisions
- July 26 2008 - v0.5
- First Release to the public in Bootstrike.Com
- Sept 23 2010 - v0.52
- Updated for Windows 7, which is similar to Vista
Last Updated 23rd September 2010
Errors? Omissions? Need Help? Know something? Post your queries in the comments below
This document is Copyright(©) 2001-2010 by G.Ganesh.
| new post | [ expand all ] |
15 comments
Last edited by jraju 21 Mar 2015 .